Friday 22 July 2011

Tour de Hexagon & Pay It Forward

In my last post I promised my new Grandmother's Garden quilt would not take another 17 years to make, as I had one flower block as a leftover from the big project. I had the remaining fabrics still left in a basket, and a handful of basted hexagons. It took me some time on the Pyrenees (with Le Tour de France, on TV, naturally) to make these:


As the cyclists are torturing their muscles on the Alps, I'm stitching. That was quick, wasn't it? I must admit this quilt is not a very large one.


A while ago Melanie announced the PIF challenge she took, and I was one of her lucky three who promised to carry on and pay it forward to another three persons. Do you know what this is all about? The original idea is from a film, and it is living its own life in the blog world. The rules are simple: I promise to send a handmade (by me) gift to the first three people who are willing to join in. I don't know yet what the gift will be, but I will send it within a year from now, probably much sooner. What you need to do to get that gift, is write about the PIF on your blog and make the same promise. I have played along once before, when I had just started my blog, and back then I only had two answers. Therefore I promise a gift to the fourth person as well, to keep my original promise from 2008. Now I'm just waiting for my PIF gift from Melanie to arrive before the end of the year, but meanwhile I would love to start planning nice gifts for you, my dear readers. To give you an idea of the kind of gifts we are talking about, check here (scroll down past the interesting Egypt tour if you just want to see her gift) what Melanie got from Anne Marie, or what I got from a Swedish Ulla.


The weather has been too hot again. Our tomatoes five weeks ago were like this:


And now they are as tall as I am, almost at least. There are some tomatoes too, all green and small but they seem to grow fast. Like they say in the song in West Side Story "everything's big in America".  The tall plants are from the seeds we had from Candace and Mr. Squash. In the lower right corner you can see our Finnish tomato plant in a pot, about 30 cm high so they have hardly grown since the first picture was taken.


I hope you can enjoy the summer, remember to drink enough water if the weather  is hot. Who wants to sign in for the PIF? Be sure I can contact you when you leave a comment.

Friday 15 July 2011

New project, and swan news

This week I was looking for a nice hand sewing project for Tour de France, and came across a leftover block from an earlier project. I unpicked the outer row and two hexagons and had this flower for my new Grandmother's Garden:


When I first started blogging, it was to get this quilt finished at last after working on it on and off during 11 summers and leaving it to mature for several years before the final push in 2008.


My daughter's quilt has 2,226 little hexagons, hand pieced and hand stitched. I'm still going to work that way, and use the same fabrics I had chosen for the big quilt, but this time the quilt will just be a little one. I will share this process with you, and I promise it will not take 17 years!

The reason why I needed a new project was that I finished the previous one. I had been knitting beanies and a scarf for Jan's Oz Comfort Quilt projects. Here I used some super soft and fine yarn Stephanie has sent me:


Here is the multi-coloured green beanie again with two others I knitted with my leftover yarns.


I mentioned in my stash use report the clothespin aprons I made. Here is mine, hanging on the washline waiting for the laundry to dry. The fabric is ' "Klopins" - Sven A. Gefeldt - Design Finnish Linen printed exclusively for Nordiska Kompaniet'. Nordiska Kompaniet is a big warehouse in Sockholm, Sweden. The fabric used to be curtains in our utility room when Scandinavian Design was getting very famous, in the 1950-60's. Now the curtains are faded and stained, but they can have a new life in close contact with real clothespins. In case you wonder, the design is white clothespins on yellow background.


Some weeks ago I went to the village centre to take pictures of the swan family, last year's couple with five new cygnets, who had been seen there again. On that day there were big lawn mowers working around the pond, and a man with a trimmer too, so the peace-loving birds had moved back to the smaller, more quiet pond where they nest. Last week I was lucky to have my camera with me on an early morning walk. The pond was quiet and the weather was beautiful.


One of the swan parents was there! They obviously take some time off from childcare and fly in turns to this bigger pond for some private time and a quiet breakfast without interruptions.


I stayed behind a tree and hardly moved when I took several pictures of this whooper swan, but maybe the click of the camera was too loud for him after a while. I felt he was saying something about staring and privacy, so I put the camera away and walked home. I had private cup of tea and some newspaper reading without interruption and without anyone staring at me.


I'm looking forward to seeing the cygnets' flight practice at the end of the summer when they need to get to these wider waters in order to have long enough landing strips.

Friday 8 July 2011

Zippered pocket tutorial, and bird babies

 Bags are nice, and bags with a zippered pocket inside are even nicer. When I make a bag for myself, I usually like to add a pocket to keep my keys and cards safe while the bag can preferably be open or closed with a single button. Maybe you think zippers are difficult to sew, but I can show that they are not necessarily. (Changing a zipper for boys' jeans is on the top of my least favourite list.)

EDITED TUTORIAL
First you need to measure the zipper you are going to use. I prefer 18 or 20 cm, the length commonly used on skirts and trousers. Measure the teethed part only, and add a tiny bit like 2-3 mm.


Cut the pocket so the width is the same or more than the length of your zipper tape. The pocket can only be as deep as the distance from the zipper to the bag bottom. Draw a line as long as you just measured, about 3 cm from the top of your pocket fabric:


Pin your pocket fabric right sides together on the lining where you want the pocket. Now sew a square around your line using the side of your normal sewing machine foot as a guide. Make right angle corners and double stitch the ends where your drawn line ends.


Here is my square, you may need to click the picture to see  better.


Then comes the exciting part: you must cut along the line. I start by folding the fabric in half across the line and cut a hole along the line somewhere in the middle.


Then open the fold and carefully cut along the line. When you are close to the end, cut towards each corner but be careful not to cut your stitches. Do this at the other end as well.


Then pull the pocket fabric through the opening, and finger press the seams flat. Pin the pocket on the lining at the corners, finger press the ends so there are no wrinkles. If this seems impossible, you may need to cut a bit more, but again be careful with the stitches. You could iron the opening to make things easier at the next stage.


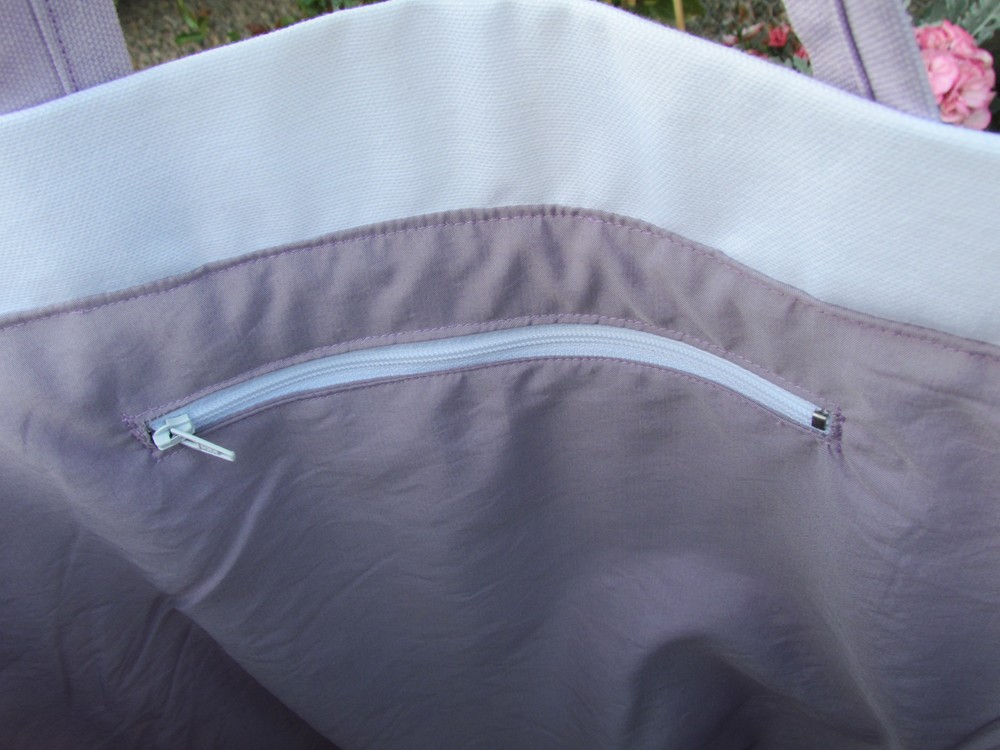
Next take you zipper and pin it under the opening with the pins on the right side. Use your zipper foot if you have one. This can be done with a normal foot or a quilt foot as well. I usually stich the zipper down on both sides, so I started on the right side, with the zipper pulled down a bit so I can make a straight line.  When I have sewn  down to the first pin, I stop with the needle down, lift the foot and pull the zipper closed. Foot down again, and continue sewing close to the edge of the fabric all the way down, make a nice turn and double stitch across the bottom. Then change your zipper foot to the other side and sew across the top a double stitch, and finally down the left side of the zipper. Again, you can open the zipper for the first bit if your needle comes close to the zipper pull.


Here is the zipper on the reverse. Notice that I have sewn the top ends of the zipper tape together, this helps to sew a nice square seam when fastening the zipper.


To make the pocket, sew both pocket tops together above the zipper -the zipper foot  is good for this as well. You need to fold the bag lining away and sew only the pocket fabrics.


Then join the pocket sides, and bottom, if you have a separate pocket back fabric (I had a long piece which I  folded at the bottom). Stitch the pocket front piece (with the zipper) on the pocket back with right sides together.


 The pocket is now ready, and you can finish your bag lining. You can make any bag pattern perfect for you by adding the pockets you need.


Here is my new bag made of the fabrics I bought in June. I have another one coming in white with purple dots.


A week ago the pied flycatcher babies flew out from their nice house. This last one took a long time, coming to the opening and going back in again.


Finally it made the decision, jumped out and ended up on a big branch about a metre from the nest. The mother came immediately and rewarded the baby with a treat. I watched them for about five minutes, but apparently the baby then knew how to fly, and they both vanished. I can still hear them almost every day, but they don't live in the nest any more.


The baby is almost the same colour as the oak, and with his or her back towards the camera. You can click the  pictures to enlarge.

Sunday 3 July 2011

Stash use report for June

Welcome to hear about my month with fabrics. Take some rhubarb upside down cake with your coffee:


Or maybe I can bribe you with some wild strawberries? The aroma is way better than in the big strawberries from the garden or strawberry field.


You have heard of my favourite fabric shop closing, and selling their stock with 30 % and 40 % off., and how I started buying fabrics for backings and bags and unknown purposes. Well, in June the prices went irresistible:


Sewing notions -50 % and all fabrics -70 %. With the cake and the strawberries I offered you, can you blame me for this:


or this?


I may have not photographed all new fabrics but I did measure them, and  25.4 m new fabrics bought with money came home with me in June. (This is my clever way of not counting the fabrics I have been given, as they are not new and I didn't ask for them.) It is a lot, but I really can't see why on earth I should need to buy any new fabrics this whole year.

On the stash reducing side, I have not been quite idle. I used 3 m for the children's pillowcases, about 1.2 m for my Antique Mary Jane bag (as you see, all fabrics used count, old and new!), 1.5 m for some clothespin aprons and Kaaren's block, and finished the crumble quilt which took 3.4 m off my shoulders, as I already counted the crumble blocks last month. The fabrics used in June total 9,1 m. That is not bad after all, I think, only leaves me with 16,3 m more fabric than I had at the beginning of the month. Ouch!  I sincerely hope everyone else carrying the Use your Stash badge has done better than I have!


The weather has been hot again, and we are expecting a refreshing thunder and rain before we melt away. Not much energy for sewing as the sewing machine is in the hottest room of the house. I have been stripping paint instead, trying to get all the black paint off a little cupboard before I will paint it white and fill it with my sewing things which without warning have taken over the high table I was supposed to keep empty for cutting my fabrics.